Table of Contents
An alert is a notification that is generated when a specific event or condition occurs, such as a vehicle going over a certain speed limit or a driver exceeding their allotted hours of service. Alerts can be configured to notify fleet managers or other designated personnel via email, text message, or other means, allowing them to quickly respond to potential issues and maintain compliance with regulations.
To get started #
- Login to your account
- Go to Settings > General > Alert
- Click on the ➕ button on the taskbar. A new window will open.

- Select the Company and Branch from the dropdown menu for which you want to set alert.

- Select on what vehicles you want the alerts from the Based on field
- Object: If you want to select different objects then select object.

- Select Object from the dropdown list if you want the vehicle alerts based on objects.
- Object group: If you want to add an alert on certain group of objects then select object group.

- Object: If you want to select different objects then select object.
- Select the Company and Branch from the dropdown menu for which you want to set alert.
-
- Select Object Group from the dropdown list if you want to add alerts on a particular group of objects.
[to be linked to master]
- Select Object Group from the dropdown list if you want to add alerts on a particular group of objects.
- Provide an Alert Name according to the alert you want.
- Select the Alert Type from the dropdown list.

- Select the Value according to the alert type selected. For example; If you want the alert when the AC starts then you can select start.
- Type the message you want to send as an alert in the Text field.
- Set the validity of when you want the alert to be generated.
- Everyday: If you want the alerts to be generate on daily basis then you can select everyday.

-
- Select the start and end time when you want the alerts to be generated.
- Select the time frame within which you want the alert to be generated.
-
- Custom: If you want to generate alerts on some particular days then you can select custom.

- Custom: If you want to generate alerts on some particular days then you can select custom.
-
- Select the days of a week when you want the alert to be generated.
-
- Select the time frame within which you want the alert to be generated.
-
- Time zone: Select the preferred time zone when you want to receive the alerts.
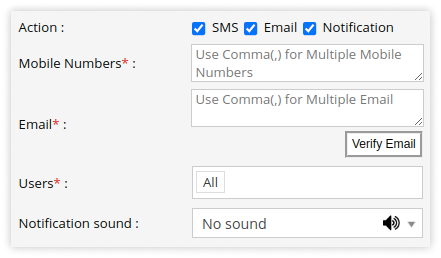
- Select the Action as how you want to receive the alerts.
- SMS: Add the mobile number in the provided text box on which you want to send the alerts. Use comma (,) as a separator if you are adding multiple mobile numbers.
Please Note: SMS configuration is necessary.

-
- Email: Add the email address on which you want to send the alerts. Use comma (,) as a separator if you are adding multiple email addresses.
Click on Verify Email to verify the entered email addresses.
- Email: Add the email address on which you want to send the alerts. Use comma (,) as a separator if you are adding multiple email addresses.
Please Note:
- Email configuration is necessary.
- By clicking on Verify Email, a verification email will be sent to the entered email addresses.
-
- Notification: To notify subusers with alerts select Notification.
- Select Users from the dropdown list.
- You can also select Notification sound as per your alert.
To add an alert from the Bongo IoT mobile application, click here.
To download alert details from the Bongo IoT mobile application, click here.


