Users can automate work assignment, route planning, and tasks, while Bongo IoT simplifies scheduling for them.
Users can assign jobs one by one. This document guides how to assign a job.
To assign a job #
- Login to your account.
- Go to Settings > Master > Job
The page you land on is the jobs overview page where you can have a look at all the job records.
- Click on the ➕ button on the taskbar.
- Select the Company, Branch from the dropdown list.
-
- Enter Name, Description of the job.
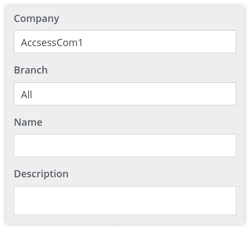
- Enter Name, Description of the job.
-
- Select Job Type as per your requirement.
- With Object: Select With Object if you want to create a job with object
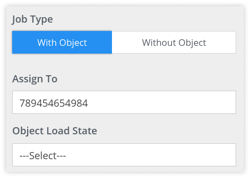
- With Object: Select With Object if you want to create a job with object
- Select Job Type as per your requirement.
-
-
- Select the vehicle from Assign To from the dropdown list, to which you want to assign the job.
- Select the Load State from the dropdown list.
- Select the Schedule Type as per requirement.
- Daily: Select Daily if you want to set a daily schedule.
-
-
- Weekly: Select Weekly if you want to set a weekly schedule.
Select the days of the week you want to schedule the job for.
- Weekly: Select Weekly if you want to set a weekly schedule.
-
- Monthly: Select Monthly if you want to set a monthly schedule.
Select the dates of the month you want to schedule the job for.
- Monthly: Select Monthly if you want to set a monthly schedule.
-
- Enter Est. Start Time, Est. End Time and Force Close Duration respectively.
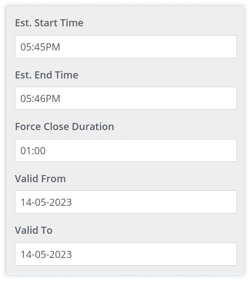
- Enter Est. Start Time, Est. End Time and Force Close Duration respectively.
-
- Select the Valid From and Valid To date from the date picker.
-
- Click on Show Extra Fields to enter the optional details.
-
- Select what you want to Copy From
- Select what you want to Copy From
Copy from group allows the user to duplicate the configuration from previously created groups so that, the user does not have to select the configuration again if he wants to grant the same access rights to the user.
-
- Previous Job: Select previous job if you want to copy from the previous job.
Select the Previous Job from the dropdown list.
- Previous Job: Select previous job if you want to copy from the previous job.
-
- Playback: Select playback if you want to copy from the previous job.
Select the Playback from the dropdown list. - Check the box if you want to Add Start and End points, Checkpoints with reach time and Consider Job with Route.
- Enter the Route Tolerance (meter) and Job Start Buffer Time (minutes).
- Playback: Select playback if you want to copy from the previous job.
Route Tolerance is set 50 meters by default. It can be changed as per requirement.
-
- To add the checkpoints one by one:
- Click on the ➕ button.

-
- Select if you want to Search Location from Map or Address Book.
- Search the location of checkpoint in the search bar.
- Enter the Name of the checkpoint.
- Select the Radius of the checkpoint.
- Check the box if you want to Add as Address.
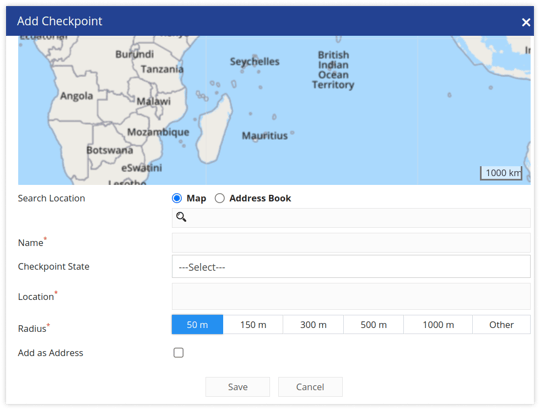
- Click on Save.
- To add the checkpoints in bulk:
- Click on the upload button.

-
- Download the sample file from the link given, fill in the file, and upload the same.
- Check the box if you want to Add as Address.

- Click on Save.
-
- Fixed:Select Fixed if you want to create a Fixed schedule which does not repeat on a particular time.
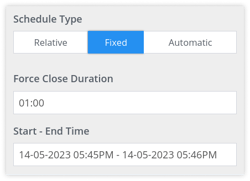
- Fixed:Select Fixed if you want to create a Fixed schedule which does not repeat on a particular time.
-
- Enter the Force Close Duration of the job.
- Select the Start-End Time of the job from the date and time picker.
-
- Click on Show Extra Fields to enter the optional details.
-
- Select what you want to Copy From.
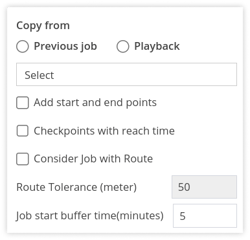
- Select what you want to Copy From.
Copy from group allows the user to duplicate the configuration from previously created groups so that, the user does not have to select the configuration again if he wants to grant the same access rights to the user.
-
- Previous Job: Select previous job if you want to copy from the previous job.
Select the Previous Job from the dropdown list. - Playback: Select previous job if you want to copy from the previous job.
Select the Playback from the dropdown list. - Check the box if you want to Add Start and End points, Checkpoints with reach time and Consider Job with Route.
- Enter the Route Tolerance (meter) and Job Start Buffer Time (minutes).
- Previous Job: Select previous job if you want to copy from the previous job.
Route Tolerance is set 50 meters by default. It can be changed as per requirement.
-
- To add the checkpoints one by one:
- Click on the ➕ button.

- Select if you want to Search Location from Map or Address Book.
- Search the location of checkpoint in the search bar.
- Enter the Name of the checkpoint.
- Select the Radius of the checkpoint.
- Check the box if you want to Add as Address.
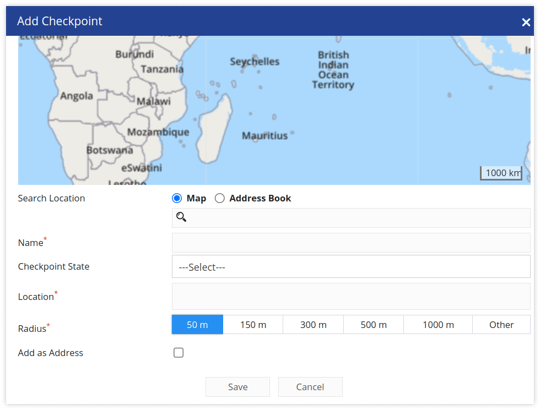
- Click on Save.
- To add the checkpoints in bulk:
- Click on the upload button.

- Download the sample file from the link given, fill in the file, and upload the same.
- Check the box if you want to Add as Address.

- Click on Save.
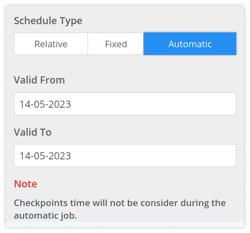
- Automatic:Select Automatic if you want to create a schedule that is not bounded by time.
-
- Select the Valid From and Valid To date from the date picker.
-
- Click on Show Extra Fields to enter the optional details.
-
- Select what you want to Copy From.
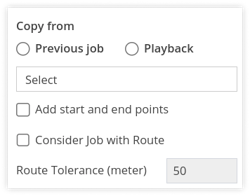
- Select what you want to Copy From.
Copy from group allows the user to duplicate the configuration from previously created groups so that, the user does not have to select the configuration again if he wants to grant the same access rights to the user.
-
- Previous Job: Select previous job if you want to copy from the previous job.
Select the Previous Job from the dropdown list. - Playback: Select previous job if you want to copy from the previous job.
Select the Playback from the dropdown list. - Check the box if you want to Add Start and End points and Consider Job with Route.
- Previous Job: Select previous job if you want to copy from the previous job.
-
- Enter the Route Tolerance (meter) and Job Start Buffer Time (minutes).
Route Tolerance is set 50 meters by default. It can be changed as per requirement.
-
- To add the checkpoints one by one:
- Click on the ➕ button.
- Select if you want to Search Location from Map or Address Book.
- Search the location of checkpoint in the search bar.
- Enter the Name of the checkpoint.
- Select the Radius of the checkpoint.
- Check the box if you want to Add as Address.
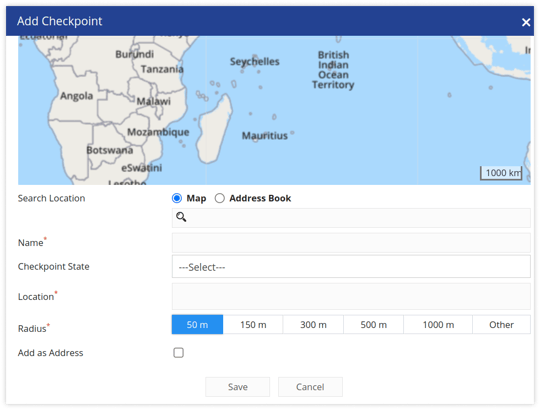
- Click on Save.
- To add the checkpoints in bulk:
- Click on the upload button.

- Download the sample file from the link given, fill in the file, and upload the same.
- Check the box if you want to Add as Address.

- Click on Save.
Please Note: Checkpoints time will not be considered during the automatic job.
-
- Without Object:Select Without Object if you want to create a job without object.
-
- Select what you want to Copy From.
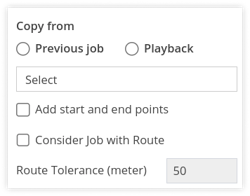
- Select what you want to Copy From.
Copy from group allows the user to duplicate the configuration from previously created groups so that, the user does not have to select the configuration again if he wants to grant the same access rights to the user.
-
- Previous Job: Select previous job if you want to copy from the previous job.
Select the Previous Job from the dropdown list. - Playback: Select previous job if you want to copy from the previous job.
Select the Playback from the dropdown list.Select what you want to Copy From. - Check the box if you want to Add Start and End points and Consider Job with Route.
- Previous Job: Select previous job if you want to copy from the previous job.
-
- Enter the Route Tolerance (meter) and Job Start Buffer Time (minutes).
Route Tolerance is set 50 meters by default. It can be changed as per requirement.
-
- To add the checkpoints one by one:
- Click on the ➕ button below.

- Select if you want to Search Location from Map or Address Book.
- Search the location of checkpoint in the search bar.
- Enter the Name of the checkpoint.
- Select the Radius of the checkpoint.
- Check the box if you want to Add as Address.
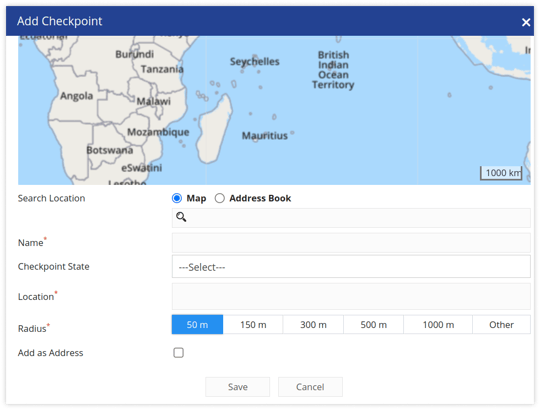
- Click on Save.
- To add the checkpoints in bulk:
- Click on the upload button.

- Download the sample file from the link given, fill in the file, and upload the same.
- Check the box if you want to Add as Address.

- Click on Save.
Please Note: Checkpoints time will not be considered during the automatic job.
- Click on the Save 💾 icon.


