Table of Contents
Uploading trailer details will benefit users with an accurate, up-to-date inventory of trailers, including important information.
Businesses that rely on trailers in their operations can use this module for managing and tracking trailers in their fleet.
To upload trailer records one by one or in bulk, consider the following steps.
Please Note: Trailer module is included only in Bongo IoT Premium.
To get started #
- Login to your account
- Go to Settings > Trailer > Trailer
The page you land on is the trailer overview page where you can have a look at all your trailer records.
To upload trailer records individually #
- Click on the ➕ button on the taskbar.
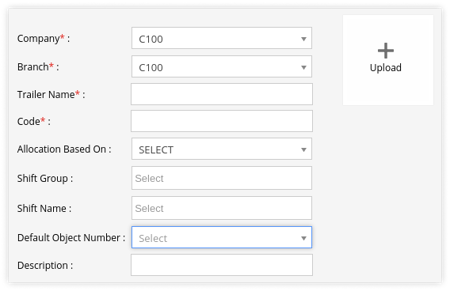
Navigate to General #

- Select the Company and Branch under which you want to add the trailer from the dropdown menu.
- Enter the Name of the trailer which can also be the plate number.
- Enter the Code of the trailer.
- Select what is the trailer’s Allocation based on from the dropdown menu.
- Select the Shift Group and Shift Name if the trailer has to work during a specific shift time.
- Select a Default Object Number from the dropdown menu if you want assign a default vehicle to the trailer.
Navigate to Custom Label #
Users can create label names to add additional fields to enter customised information of the trailers
- Click on the Custom Label + button to add a new label.

- Enter the Label name and Value as per requirement.
Navigate to Document #
- Click on Document +.
-png.png?width=300&height=89&name=Frame%20475%20(1)-png.png)
- Add Document Type from the dropdown list.
- Add Document Name.
- Upload the Document image from your system.

- Enter the document Issue Date.
- Enter the document Expiry Date.
- You can download the document image by clicking on the Download
- You can also Delete the Document details by clicking on
 .
.
To upload multiple trailer records #
- Click on the upload button on the taskbar.

- Select the Company and Branch from the dropdown list.

- Download the sample file from the link given. The file will hold the basic information about the driver such as driver name, driver contact number, state, city, RFID tag details etc.

- Upload the XLS file with after filling up the details.
- Click on the save 💾 icon.
- Select the Company and Branch from the dropdown list.


